

- cross-posted to:
- diy
- cross-posted to:
- diy
Once you get access to a laser cutter, you start to see all kinds of places you can use it in a project. Our local makerspace has one, and the more I use it, the more I find new applications, whether that’s in fabrication of flat parts, or just adding flair to smaller panels of a large project.
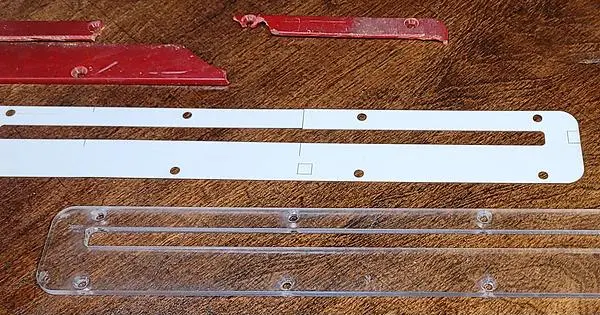
Around Christmas, I decided I was going to fix up my dad’s miter saw. It was an older, discontinued Delta 36250. The guard was missing(my grandfather didn’t believe in tools having guards) and the plastic insert in the table, where the saw blade came down, had been shattered for years.
The guard was an easy fix, bought a replacement part from ereplacementparts. But the plastic inserts were out of stock. In fact, even the scam parts websites that all look identical weren’t bold enough to lie and claim to have any of these things. Having examined what was left of the original, here’s my theory for why:
They’re junk. The space they fill is 5mm deep, but they were made to be cast out of plastic about 2mm thick with a lip around the edge to fill in the space. That plastic was super brittle. And then,just to make things better, the slot in the plastic, where the saw blade would go when it cut through the wood, wasn’t wide enough to accommodate the blade when it was rotated to do cuts at a 45 degree angle. Which it was designed to do. So the blade would come down through the wood, hit the brittle plastic at the wrong speed and blade type for cutting plastic, and shatter it. The inventories were out of stock because everyone broke theirs and ordered new ones, and they weren’t worth making in the first place
The obvious answer was to cut something close enough out of plywood and call it a day, but I wanted to get fancy with it. So I took some pictures, removed all the screws, claimed all the shards of plastic, measured the space, and brought the pieces home. Luckily enough pieces of the insert remained to get every measurement except overall length (which I measured while I was there). I used my calipers to get the original slot width, positions of the screw holes, etc. I drew up a vector image with my best guess at the final dimensions, and widened the slot until it slightly exceeded the damage marks from when the saw cut into it at a 45.
To get the curve at the corners I scanned in one of the shards, pasted it into the schematic in inkscape, and adjusted the rounded corners setting on the rectangle until it matched the scan.
On our makerspace night I cut a few cardstock templates, chased the screw holes around the design until they lined up with my plastic shards. And because I like adding some decorative aspect to practical items, I also drew up and cut a stencil of the name of his old military unit surrounded by a hawser rope.
This is one of the places the laser cutter really shines. When I was doing spray paint stencils in the past, I always cut them by hand with a scalpel blade(ironically cheaper than xacto knife blades). But this is tedious, takes forever, and certain designs really don’t lend themselves to it, so you find yourself spending lots of time gluing your bridges back together as they tear or bend. With the laser cutter, I had a template literally in minutes, and at least as precise as I could have done it. Some folks feel the art looses something when you make it easy that way, I’m personally more about results, especially when I’m on a timeline.
The makerspace didn’t have any plexi in the thickness I needed for the insert, so I reached out to TAP plastics for a recommendation. They had 4.5mm High Impact Modified plexiglass which they’d ship in custom dimensions, so I could get something small enough to fit inside the cutter. I went ahead and ordered that, and about a week later I had it. Enough material for four tries.
We ran the first cut slow in order to cut the thicker-than-usual plexi. That ended up melting it a bit along the edges and at the holes, so we did the second in two passes. I also redesigned the vector with smaller holes, and sent it again. This one came out better dimensionally, but the cutting fogged the plexiglass (it was the kind protected by sheets of plastic rather than paper, so we had to remove the stuff before running it in the laser). This wouldn’t be a problem except that I was planning to stencil the art onto the back of the plexiglass, so it would look deep and glossy, and would be protected by the plastic itself.
I covered the remaining material in painter’s tape and ran it again. The third one came out great, and I took them home for finishing.
The next step was to chamfer the screw holes on the drill press.This would let the heads of the screws sink down into the plastic where they’d be out of the way of boards sliding across the worktable.
Once I had that done, I peeled the painter’s tape off the back,and for once managed to remember to double check that it was actually the back and oriented correctly and everything. Then I attached the stencil so it was mirrored. I normally use temporary spray adhesive where I can to fasten the stencil down, to minimize the underspray. But a reverse stencil means any glue residue would end up between the plastic and the next coat of paint, so I had to skip it and just use stencil spiders (little metal weights, usually nuts, with paperclip/wire legs, which help you pin down high points).
I got very lucky, the paint went on well and didn’t leave me with any spots I had a problem with. I gave it a couple days to dry before messing with the stencil (this was good graff artist paint, but I’ve had the cheap stuff dry tacky, then when you try to lift the stencil, the paint stretches, snaps, falls onto the work and bonds there. I didn’t think that would happen with this stuff but I wanted to be really sure). Waiting to find out if it came out okay is the worst part, for me.
When that was dry I checked it over, and painted on the background color.
By that point, I was out of time to check it for fit, so I wrapped it and waited until Christmas to find out if it would fit. Later that day, we tested it, and it was overall pretty good - I had to chamfer the holes a bit deeper on his drill press, and used a thin round file to adjust a couple of them just a touch outwards from the center. But it fit and looked quite nice overall. My vector file isn’t perfect, but I’m providing it on my website just in case anyone out there has a compatible saw and also access to a laser cutter, and for some reason wants to follow me down his road.
The saw file is available here as a pdf: https://jacobcoffinwrites.files.wordpress.com/2024/01/saw-insert-great.pdf (apparently wordpress won’t host SVG files.)
And here as both pdf and svg: https://mega.nz/folder/CdMwVDQa#yiHp5k_WbOxrNcYCRwWyiA
(Sorry not to show the stencil, I realized partway through writing this that my dad wouldn’t appreciate it if I did, but I still like talking about the stencil art process.)
You must log in or register to comment.