

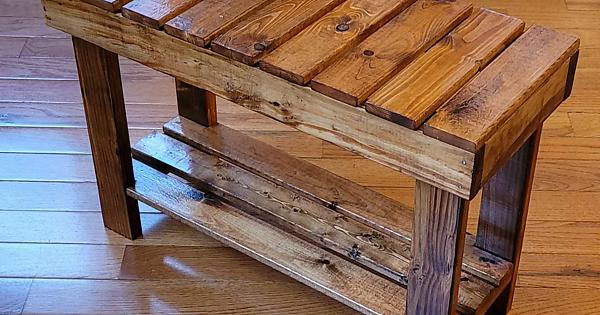
This one was scratch-built as a gift. They wanted a shoe rack and sent me some links of examples for sale on amazon. The designs weren’t consistent, so I took what I felt were good features from each and built one from lumber I had.
Most of it was just pressure treated 2”x4”s someone on Everything Is Free had been looking to get rid of while cleaning out under his deck (these are the ones with thick, visible grain and a slight greenish tinge (always wear a dust mask while sanding but especially for these)) and older heat-treated 2”x4” whose origin I don’t remember.
The top section’s side plates and the supports for the lower shelf were cut from lengths of white-primed trim – these were edge-glued boards, meaning they were glued together from pieces of smaller scrap, and had zig-zaggy joints straight across the face of the lumber here and there. Because these joints are kind of ugly and not as strong as the regular wood, I cut sections from it that didn’t include them. Then I sanded off the white primer (wear a dust mask for this too) so I could stain them to match the rest of the piece.
The hardest part was finding something for the shelves themselves. I had a few thin lengths but not enough, and ended up posting to the Everything is Free page with a couple example photos asking if anyone had something close. Within minutes a guy offered up some bedrails he’d found on garbage day. He had taken them so they wouldn’t go to waste but didn’t have a project in mind and was happy to offer them up. I sanded them down smooth and cut them to length.
Wherever I can, I use wood screws as they’re much easier to remove than nails. But for a piece of furniture with very visible joints like this, I used finish nails almost everywhere. I also glued the joints as I nailed them so they wouldn’t work apart (this was especially necessary on the top, as the finish nails were thin brads and the slats liked to try to wander as I hammered others into place).
Once it was done, I treated it to the usual stain and polyurethane (both left over from previous projects, the stain I think was second-hand).
I was pleased with the final product - it’s surprisingly sturdy for something without any 45’s in the design - and the recipient liked it quite a bit, which is what matters.
Once it was done, I treated it to the usual stain and polyurethane (both left over from previous projects, the stain I think was second-hand).
This is the finishing touch that makes it go from a DIY project to an actually nicely looking piece of furniture. Well done!
Thank you! I’m getting more into finishing - I have friends who’ll do all kinds of weird cool stuff, mixing paint into their stains to get neat effects, but I learned from carpenters, not furniture makers, so I rub in the stain using old paper towels then just brush on high-gloss poly. I keep meaning to try wipe-on poly, I’m told it goes on in thinner coats using a rag, leaving no brush strokes and dries much faster so you get less dust adding texture, but you need more coats. I have mineral spirits and polyurethane, so I could just make it, but I keep putting it off because I don’t like the idea of wasting cloth rags one and done. I should probably try a shellac someday too, since I thought I read that it’s made from some kind of insect shell and will decompose? I’d like not to be creating microplastics when I sand these things.
I wish I had the vision to see projects like this! I’m just like, oh a pile of wood…
Great job OP!
Thanks! With most things, I think I start with wanting to make a specific thing and casting around looking for what I have that I can use to make it (and then adjusting the final design around what I find).
If you’ve ever seen one of those galleries of stuff confiscated from prisons, I think it works the same way - who would think to make a tattoo gun made from part of a Windex bottle, a pen, the vibrating motor from a game controller, etc? but if you start from the end goal and work back, it’s just a really clever use of very limited materials under very tight constraints.
I think sometimes the constraints help by simplifying your options - especially in creative stuff like carving, writing, photobashes, etc, but in regular woodworking too
That makes total sense!